

Unveiling the Basics of Scanning
Diving into Scanning Resolution
Scanning resolution unveils the level of intricacy captured when scanning an image or document on your Canon printer. Opting for higher resolution settings guarantees razor-sharp details, while lower resolution settings sacrifice some detail for quicker scan times. When selecting the scanning resolution, it is crucial to take into consideration the intended use and purpose of the document. For instance, scanning a simple text document may suit lower resolution settings, while preserving the intricate details of a high-quality photograph may demand higher resolution settings.
Unlocking the World of Scanning Formats
Canon printers offer an array of scanning formats tailored to diverse needs. One widely used format is PDF, which ensures compatibility and maintains the formatting of the scanned documents. JPEG, on the other hand, is a popular choice for scanning photographs and image-based documents. Additionally, Canon printers support other formats such as TIFF and PNG. The choice of scanning format depends on the nature of the document and its intended usage.
Mastering Scanning with Handy Tips
1. Keep it spotless: Ensure that the scanner glass and document feeder are clean from dust, smudges, and fingerprints to guarantee high-quality scans. Regularly clean these areas using a soft, lint-free cloth and a gentle cleaning solution.
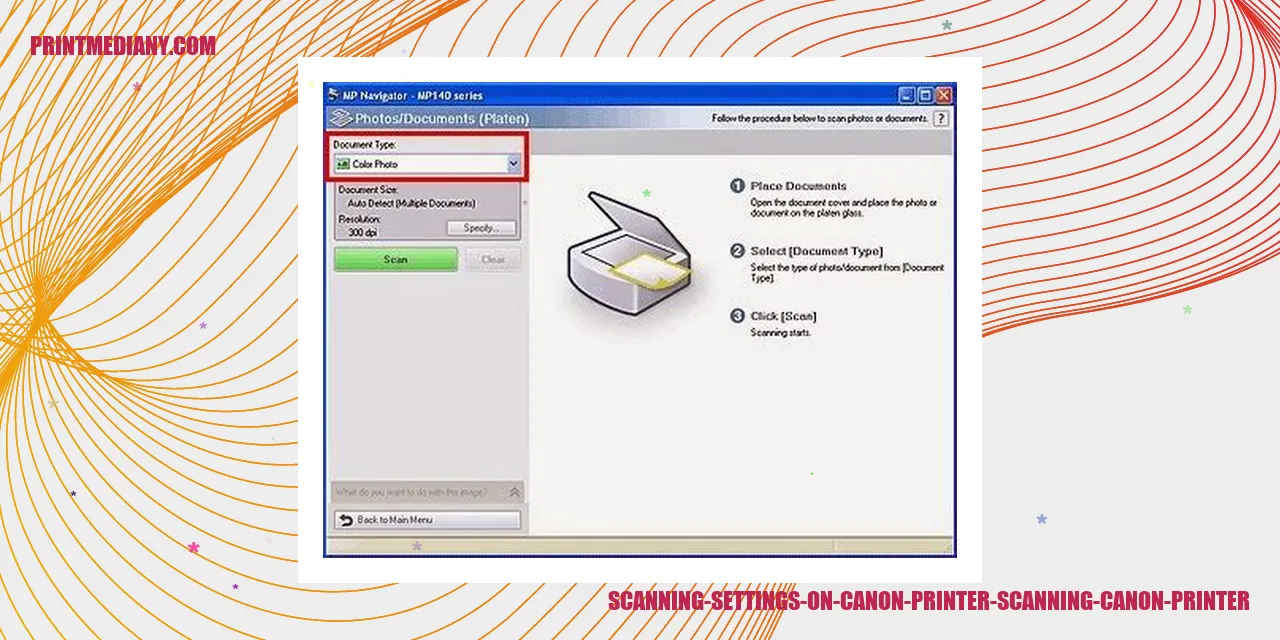
2. Optimize settings: Before scanning, make sure to customize the scanning settings according to your requirements. These settings may include resolution, format, color mode, and file size. Consult the user manual or on-screen instructions for guidance.
3. Peek at the preview: Many Canon printers have a preview option that allows you to preview the document before saving it. Utilize this feature to make any necessary adjustments and ensure the final scan meets your expectations.
4. Organize with diligence: After scanning, save the scanned files in an easily accessible location and establish a logical folder structure for efficient organization. Consider categorizing the files by date, subject, or any other relevant criteria.
5. Embrace advanced features: Canon printers often boast advanced scanning features like OCR (Optical Character Recognition) and automatic document feeders. Explore these features to elevate your scanning experience and enhance productivity.
Remember, perfecting the art of scanning on your Canon printer requires practice. By embracing these scanning basics, familiarizing yourself with scanning resolutions, exploring various formats, and implementing these practical scanning tips, you can achieve top-notch scans and unlock the full potential of your Canon printer’s scanning capabilities.
How to Set Up Scanning Preferences on Canon Printer
Personalize Your Scanning Experience
When using a Canon Printer to scan documents, it is important to tailor the scanning preferences according to your specific needs. To do this, follow these easy steps:
Read more:
- Printer Ink Canon MG3620: High-Quality Ink for Optimum Printing
- Canon Pixma Tr7020 Reviews: The Ultimate Printing Companion
- A Comprehensive Guide to A3 Color Laser Printers
Enhance the Scan Quality
Canon Printers provide several options to help you improve the quality of your scans and ensure optimum results. To customize the scan quality, follow these quick steps:
Choose the Perfect Scan File Type
Canon Printers offer users the flexibility to select the preferred file type for their scanned documents. Here’s how you can do it:
Optimize Your Scanning Experience
Canon Printers offer additional scan options to optimize your scanning process based on your individual preferences. Follow these steps to customize your scan options:
By effortlessly following these step-by-step instructions, you can easily configure and personalize the scanning settings on your Canon Printer. Customizing preferences, improving scan quality, choosing the appropriate file types, and optimizing additional scan options will undoubtedly enhance your overall scanning experience.
Troubleshooting Scanning Problems on Your Canon Printer
Scan Not Functioning Properly
Are you experiencing issues with the scanning function on your Canon printer? This can be frustrating, especially when you urgently need to digitize important documents or photos. Fortunately, there are a few troubleshooting steps you can take to resolve this problem.
First and foremost, ensure that your Canon printer is correctly connected to your computer. Check all cable connections and ensure that they are securely plugged in. If you are using a wireless connection, make sure that both your printer and computer are connected to the same network.
Next, verify whether you have the appropriate Canon scanning software installed on your computer. You can usually find this software on the Canon website or the installation CD that came with your printer. If the software is not installed, download and install it following the provided instructions.
If the scanning issue persists, try restarting both your Canon printer and computer. Sometimes a simple restart can resolve issues caused by temporary glitches or conflicts.
Issues with Scan Quality
Poor scan quality is another common problem that Canon printer users encounter. If the documents or photos you scan appear blurry, distorted, or exhibit color inaccuracies, you can take a few steps to enhance the scan quality.
Start by ensuring that the materials you are scanning are clean and free from smudges, fingerprints, or dust particles. Any debris on the scanning surface can impact the quality of the scan.
Adjusting the scanner settings can also help improve scan quality. Look for options like resolution, brightness, contrast, and color correction in the Canon scanning software. Experiment with these settings to find the optimal configuration for your specific scanning needs.
If the issues with scan quality continue, consider cleaning the scanner glass and scanning bed with a soft lint-free cloth. Dust or smudges on the glass can interfere with the scanning process and result in poor quality scans.
Unable to Open Scanned Files
It can be frustrating when you encounter difficulties opening scanned files from your Canon printer. This can happen due to various reasons, such as compatibility issues, file corruption, or incorrect file formats.
If you are unable to open a scanned file, make sure you have the necessary software installed on your computer that supports the file format. For example, if the file is saved as a PDF, ensure you have a PDF reader installed.
In some cases, the scanned file may be corrupted. Try rescanning the document or photo to create a new file. If the newly scanned file still fails to open, it might be worth reaching out to Canon’s customer support for further assistance.
Slow Scanning Speed
If the scanning speed of your Canon printer seems slower than usual, there are a few factors to consider.
First, review the scanning settings. Higher resolutions and color depths typically result in slower scanning speeds. Consider reducing these settings if speed is a priority.
Additionally, the performance of your computer can affect scanning speed. Ensure that your computer meets the recommended system requirements for the Canon scanning software. Closing unnecessary programs and optimizing system resources can also contribute to improved scanning speed.
If the scanning speed remains slow, it could be due to a hardware issue. Confirm that your Canon printer is connected to a USB port that supports high-speed data transfer. Alternatively, you may want to consider updating the printer driver or contacting Canon’s technical support for further assistance.